Logging Calls
An essential part of a rep's daily activities is to make and receive calls. They need to track calls that are made to the customers, schedule calls according to the customer's availability, maintain details of the discussions in their database, and keep a record of the missed calls so they can follow-up. It's important to record all this information in an organized manner despite how busy they may be.
The Calls layout in the Activities module provides a perfect platform to store and track every detail related to a call. The sales reps can enter call details like duration, date and time of calls, and notes about the content of calls. This data can be used to evaluate the time spent on each call or the average time a call takes to complete and more. The details can be helpful in generating reports on billing details, call status, and number of calls made per day.
Customizing the Calls layout
The layout is divided into four sections, which each have default fields to allow your sales reps to capture information about the call:
- Call information
- Purpose of outgoing call
- Outcome of outgoing call
- Reason for incoming call

You can customize the layout by adding custom fields to all the sections except for Call Information. The total number of each type of custom fields that you can add are as follows:
- String fields: 40
(Includes single line, pick list, multi-select pick list, and multi line)
Max limit for multi line, pick list, and multi-select pick list: 10 each. - Number fields: 10
- Decimal and percentage fields: 20
- Date fields: 10
- Date/time fields: 10
To add custom fields
- Navigate to Setup > Modules and Fields > Calls.
- Click the Standard layout.
Alternately, hover over the Standard layout and click More and then Edit Layout to add fields to the Standard layout. - Drag and drop the required field types from the New Fields tray on the left.

- Enter a name for the field.
- Click Save.
Log a Current Call
- Current
- Completed
- Scheduled
By maintaining call records in CRM you can:
-
In the Activities module, click New Call.
You can also associate a call to a lead/contact by clicking the Log a Call link in the Open Activities Related List in the respective record's Details page.
-
In the Create Call popup window, do the following:
You cannot add custom fields in the Create Call page. However, you can customize the existing fields using page layout customization.
- Specify the Contact/Lead name from whom the call came or to whom the call is made.
- Enter the Call Start Time.
- Select to whom the call is Related to from the drop-down list (for eg. account, quote, order etc.)
- Enter the Subject.
- Choose the Call purpose from the drop-down list.
-
Enter the Call agenda.
-
Click Call.
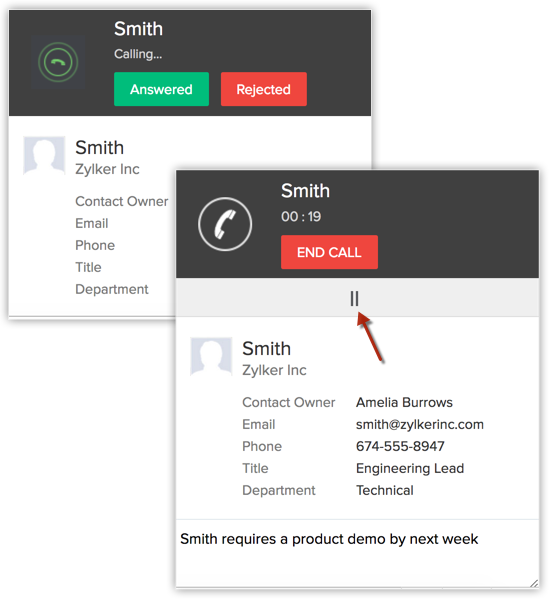
The call timer indicates the duration of the current call.
You will be taken to the interface where the call is made. You can Pause call if required.

Add a call description at the foot of the call window. You can see this in the Description field of the call once it has been saved.
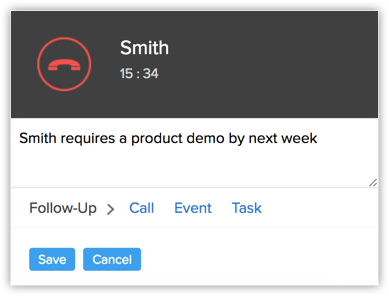
- Click End Call when the call is completed.
-
You can attach a Follow-up Meeting, Call or Task if required to the call. This will be associated with the contact.

- Specify the Contact/Lead name from whom the call came or to whom the call is made.
- Click Save to save the current call.

- The Related To field will be available only if you are calling a Contact.
- The user who logs a call is the Call Owner and you cannot change the owner of the call.
- The details of the call will be available in the Activities tab.
Log a Completed Call
To log a completed call
-
In the Activities module, click New Call.
You can also associate a call to a lead/contact by clicking the Log a Call link in the Open Activities Related List in the respective record's Details page.
-
In the Create Call popup window, do the following:
- Specify the Contact/Lead name from whom the call came or to whom the call is made.
- Enter the Subject of the call.
- Select the purpose of the call from the Call Purpose drop-down list.
- In case of a call from/to a contact, select the Related To record, if required.
- Select the Call Type as Inbound or Outbound.
-
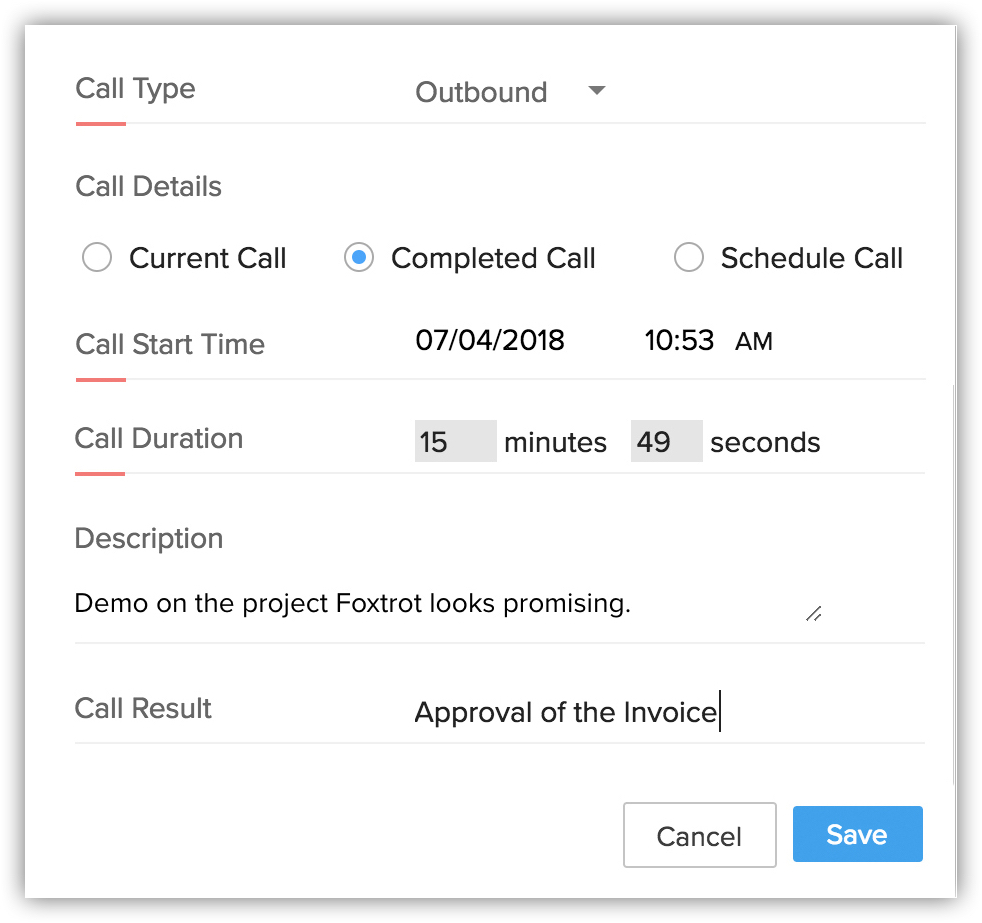
In the Call Details section, click Completed Call.
By default, Current Call is selected.
-
Enter the Call Duration in minutes and seconds.

- Specify Description and Call Result.
- Specify the Contact/Lead name from whom the call came or to whom the call is made.
-
Click Save.
The call is saved in the Activites module.
The call will also be displayed in the Closed Activities Related List in the Details page of the respective lead/contact.

- The Related To field will be available only if you are calling a Contact.
- The details of the call will be available in the Activities tab.
- Once the call is marked as completed, you will not be able to edit the record entry.
Schedule a Call
Schedule calls in Zoho CRM that can be taken up by users later. Each call that is scheduled has three option in the details page.
- Mark as Completed - The calls that you mark as completed will be moved to the Closed Activities Related List in the associated record.
- Reschedule Call - At times when you are not able to stick to the scheduled call, you can reschedule it for later.
- Cancel Call - You can also cancel a call whenever necessary.
These options are available in the call's details page, list views, related lists, reminders and calendar.
To schedule a call
-
In the Activities module, click New Call.
You can also associate a call to a lead/contact by clicking the Log a Call link in the Open Activities Related List in the respective record's Details page.
-
In the Create Call popup window, do the following:
- Specify the Contact/Lead name from whom the call came or to whom the call is made.
- Specify the Subject of the call.
- Select the purpose of the call from the CallPurpose drop-down list.
- In case of a call from/to a contact, select the RelatedTo record, if required.
- The Call Type is selected by default as Outbound.
-
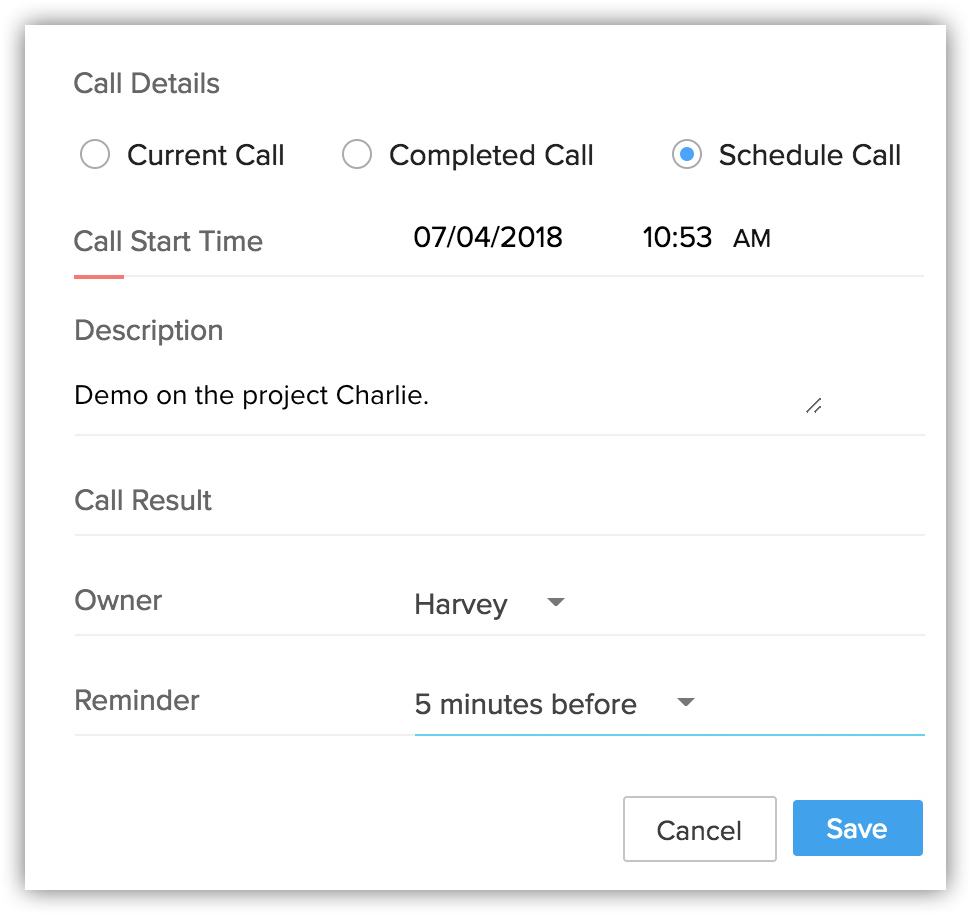
In the Call Details section, click Schedule Call.
On selecting Schedule Call, you will have the option to assign the call to a user.
-
Select the CallOwner from the lookup.

- Specify Description and CallResult.
- Select a Reminder option from the drop-down list.
- Specify the Contact/Lead name from whom the call came or to whom the call is made.
- Click Save.
Import calls
 Note
NoteYou can import data that is present in the csv or xlsx format.
When you import call records, they could be for scheduled calls or logged calls. Depending on the type of call, the following columns need to present in the sheet/file. You can have all types of calls in the same file.
For scheduled calls
1) Call Type with the value: Outbound
2) Call start time: Any future date-time value ie. date-time greater than current date-time
For completed outbound calls
1) Call Type with the value: Outbound
2) Call start time - Any past date-time value ie. date-time is less than current date-time
For completed inbound/missed calls
1) Call Type: Inbound or Missed
2) Call start time - Any past date-time value ie. date-time is less than current date-time
Associate calls with CRM records
To associate calls with CRM records
- Click the Leads or Contacts tab.
- Select the record for which you want to log a call.
-
In the [Record] Details page, the existing call details, if any, are displayed.
- Click Subject, Activity Type, Status, Due Date or Owner Name links to sort the display order of the records.
- Click the Edit or Delete link to modify or delete the call details respectively.
- Click Subject, Activity Type, Status, Due Date or Owner Name links to sort the display order of the records.
- Click the Log a Call link.
- In the Log a Call page, enter the call related details.
- Click Save, or click Save & Create Follow-up Task to save and create a follow-up task.
Standard fields in Calls module
| Field Name | Description | Data Type |
| Subject | Enter the subject of the call. | Text Box |
| Call Type |
|
Select option |
| Related To | Choose the type of record to which the call is related and then choose the record. | Drop-down list |
| Call From/To | Specify to whom the call is made or from whom the call is received. | Select option |
| Call Purpose | Choose the purpose of the call from the drop-down list. | Pick list |
| Call Result | Specify the call result | Text Box |
| Time Details |
|
Select option |
| Call Start Time | Automatically displays the current date and time. | Date and Time |
| Call Duration |
|
Numeric |
| Description | Specify the description of the call. | Text Box |

- You cannot add custom fields in the Log a Call page. However you can customize the existing fields using page layout customization.
- You cannot mark the Call Duration and Call Start Time fields as non-mandatory.
Related Articles
FAQs: Calls Module
How do I schedule a call? To schedule a call Go to the calls module on the CRM home page Click on Create Call Select Schedule a call option. On the Schedule a Call page fill in the required details. Click Schedule You call has been successfully ...Workflow for Calls
Workflow rules for calls allow you to perform certain actions automatically whenever a call is received, made, missed or scheduled. It significantly reduces manual effort of updating or adding details about the individual call. For example, you can ...What is the key difference between workflow rule for the Calls module and adding Call as an action in a workflow rule?
Creating a workflow automation for the Calls module is for efficient call management within CRM — this will automatically perform actions whenever a call is received, made, missed, or scheduled. This significantly reduces the manual effort required ...7Moor
7Moor is a SaaS provider in the enterprise communication field. You can integrate the feature with Zoho CRM for advantages like single-click dialing, screen pop-ups for incoming calls, and automatic call logging. Every call-related activity can be ...Telus
Set up Telus Integration Telus cloud phone service harnesses the power of internet to form a suite of business communication features on a cloud-based phone system. You can manage calls, host audio and video conferences, setup call routing and more - ...