Executing a Blueprint
Access My Blueprint Records
Once the Blueprint has been configured, records meeting the process criteria will enter the process and the Transition Owners mentioned in the Blueprint will be able to execute their respective Transitions.
In order to start the process, you must know which records are waiting for you to perform your part of the actions in the entire process.
To access your Blueprint records
- In your Zoho CRM account, click the My Jobs module.
- In the My Jobs page, click the Blueprint tab.
- Click on any entry to go to the respective record. You can also directly choose a transition under the Actions column.
View Configured Blueprint
To view configured Blueprint
- Go to the Details page of the record meeting the process criteria.
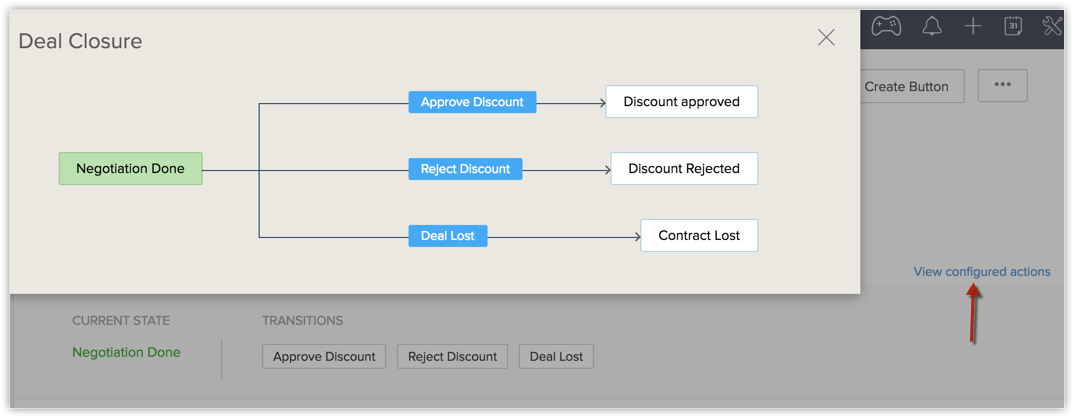
- In the Blueprint Strip, you will see the current State of the record and the Transitions available for that State.
Note that Transitions are made available only for the records meeting the Before Transition criteria. - Click the View configured actions link.
You will be able to see the process flow from the existing State to the next State.
Here, it is important to note that the field using which you configured the Blueprint will be locked for editing once the record has entered the process. That is, say you have configured a Blueprint for Deal follow-up process using the Stage field. Once a record has entered the Blueprint, you cannot manually update the Stage until the Blueprint has been executed completely.
Execute a Blueprint
Once records meet the entry criteria of a blueprint, they become active records in the process. A blueprint can be executed in your web account as well as the Zoho CRM Mobile App.
Execute a Blueprint in the CRM web account
In your Zoho CRM account, the record detail page displays the current state of the record and the transitions available for that state. To execute a transition, simply click the suitable transition button.
See also: Creating a Blueprint.
Note the following elements when executing a transition:
- Message and Notes promptsIf you have configured messages and mandated notes, the transition would appear as seen in the image below. Here, the requirements and discount details have been prompted.
- Attaching documents
If you have mandated attachments, they will be prompted in the transition, as seen in the image below. This is similar to the Attachments related list, where you can upload documents from your desktop, Zoho Workdrive, Documents tab, other cloud drives, or a URL attachment. - Striking off Checklist itemsA transition cannot be saved until the mandatory checklist items are checked off. A list of to-dos is being checked off in the image below.
- Entering fields and validationsIf you have configured mandatory and optional fields from the primary blueprint module and related modules, the transition owner will be prompted to enter the values for these fields here. If you have also configured validation criteria for any of the fields, the system will check the validation rule and let the changes be saved only when the value satisfies the criteria.Here, a discount of more than 20% throws an error:
- Associating related itemsWhen you have mandated associated items, such as quotes and tasks, the transition owner will be prompted to enter these as well on executing a transition. Here, a user is prompted to create a task.
- Saving a Transition partiallyWhen you mandate a large amount of information during a transition, it may not always be possible to enter all of them at one go. For example, in the Complete negotiation transition, perhaps you have entered all the mandatory fields, but you need some more time to score off the checklist items on SLA documents. You may need to add and modify the note that is to be added over a few days. In this case, you can use the Save as Draft. For example, maybe 5 out of 10 details you have entered will be saved at the moment, but the record will still be in the present stage.You can come back to this record when you are ready, enter the rest of the details, and save the transition. Once all the details as required by the During Transition settings have been entered, the record will be moved to the next state in the blueprint.Repeat this activity of clicking each Transition button and complete the specified actions until you come to the end of the process.

- Save as Draft will not be supported when
- Layout rules are executed
- Only message fields are present in the transition form
- A widget is present in the transition form
- Save as Draft is not supported for a Continuous Blueprint, as the nature of a Continuous Blueprint is meant to be executed at one go, rather than intermittently.
Execute a Blueprint on the CRM mobile app
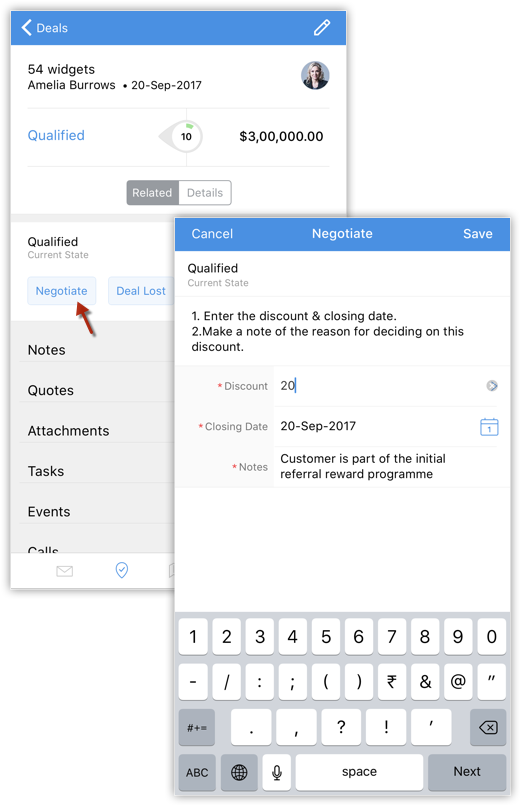
A Blueprint that you have configured in your Zoho CRM web account can be executed on the mobile app. Suppose you are out on a field visit to meet a customer regarding a deal and the deal has progressed from Qualification to Negotiation. You can update the stage right there on the app.
To execute a Blueprint using the CRM app
- Tap the module for which you wish to execute the Blueprint. Example, Deals.
- Tap the record in question.
You will see a Blueprint Strip that displayes the Current State as well as the Transitions that must be executed in order to progress to the next State. - Click the required Transition and complete the requisites as directed. Example, Negotiate.

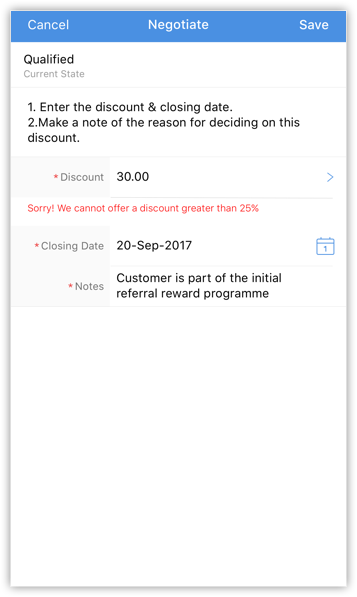
If the values you enter are unacceptable, you will see relevant error messages as configured in your Blueprint.
This way CRM guides and validates a sales process. - Once you have entered the acceptable values, click Save.
The record is now moved to the next State in the process.
In a similar manner execute each subsequent Transitions until the process is completed.

- Blueprint is available in Zoho CRM for Android from (v3.2.16) onwards.
- Blueprint is available in Zoho CRM for iOS from (v3.2.9) onwards.
Related Articles
FAQs: Blueprint
What is a Blueprint and how it is useful for my business? Blueprint in Zoho CRM is a sophisticated tool designed to digitally replicate and streamline a business's offline processes within the CRM software. It's particularly beneficial for companies ...Blueprint: Sample Process Flow
Sample Process Flows In the following slide deck, you will find sample process flows for business from various sectors such as Education, Real Estate, Insurance, Banking and Finance. These are generic process flows meant to give you the perspective ...Blueprint - An Overview
Right from the moment you capture a lead in your CRM system up until deal closure and beyond, your organization may have several sales processes in place. For instance, leads generation and follow-up, deals closure and order management. Each of these ...Designing a Blueprint
Building a process is largely a 3-step procedure. Enter Basic Info: Specify the module, layout, and field for which the process should be created. Define the Process Flow: In the Blueprint Editor, define the process flow right from the Starting or ...Troubleshooting Blueprint
1. I am not able to find a blueprint that I created. Check whether All Modules is selected under Setup > Process Automation > Blueprint. Only then Blueprints created for all modules will be displayed in the list view. 2. Transitions are not shown for ...